Initial configuration
Module configuration - TrueSight
To allow ProactivePack to connect to TrueSight for SelfService Monitoring Portal (using TrueSight PostgreSQL DB and Rest API), the following configuration should be set in SelfServiceMonitoringPortal (ProactivePack Administration => Modules => SelfServiceMonitoringPortal => Edit)
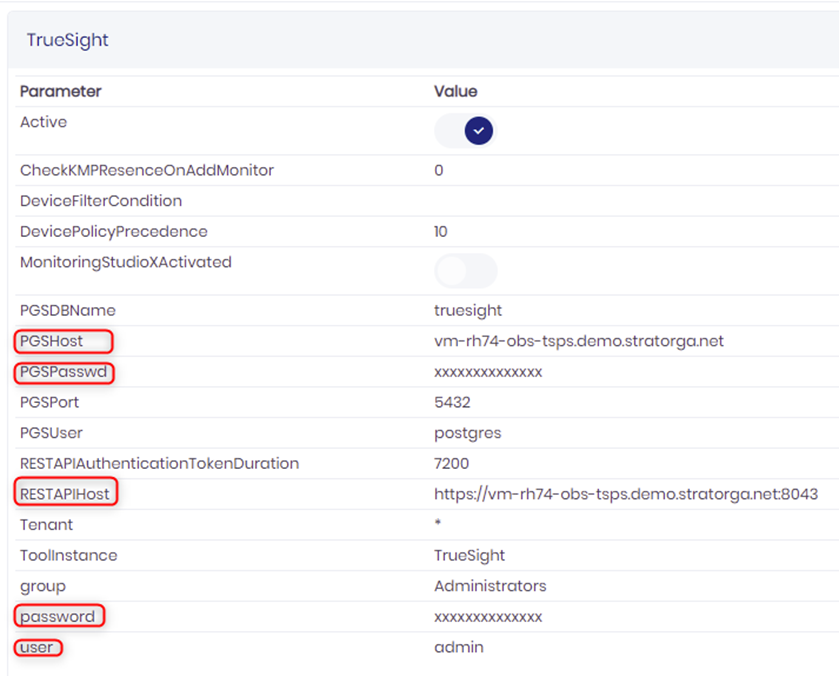
1. PGSHost: TrueSight postgreSQL host (typically the TSPS hostname)
2. PGSPasswd: TrueSight postgreSQL password (as set during TSPS installation)
3. RESTAPIHost: TrueSight REST API host (typically the URL that you would use to connect to TSPS)
4. user: TrueSight presentation server user (this user needs to have full access to TrueSight)
5. password: TrueSight presentation server user password
See this section for the module configuration parameters.
Module Configuration – BHOM
To enable usage of the Self-Service Monitoring Portal for BHOM, navigate to Administration => ProactivePack => Modules => SelfServiceMonitoringPortal => Edit, and enable the module. Also provide the username associated to the access key and his group :
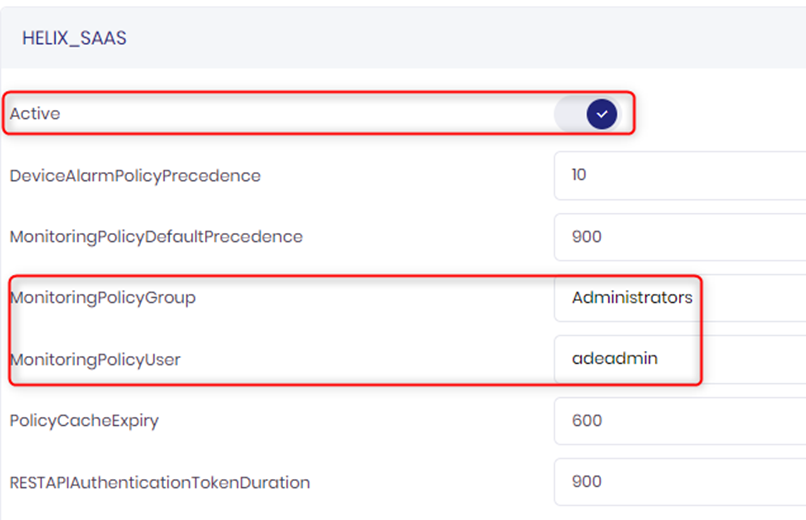
Save the changes.
Schema creation
Schema creation is not required if you use the appliance or container version of ProactivePack
After the module has been configured, the PostgreSQL database schema must be created.
1. In ProactivePack Administration -> Modules -> SelfServiceMonitoringPortal, click on the “Data Schema” button :
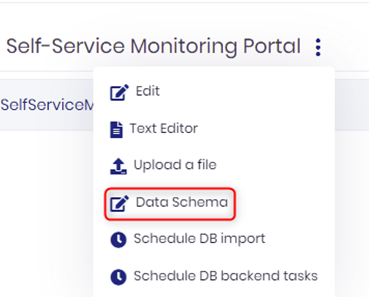
This will open a page where the schema to apply can be seen (and downloaded).
2. Apply the schema on your PostgreSQL server :
a. Copy the Self-Service Monitoring PortalSchema.sql file containing the file to the PostgreSQL server
b. Open a command window in the PostgreSQL server ./bin directory
c. Run the command :
psql -f <path to SMPSchema.sql file> -U postgres -W
(You will be prompted twice for the postgres user password)
3. Verify that connectivity to the database is ok by going to ProactivePack Administration -> About -> Prereqs validation. You should see entries as follows :

TrueSight - Knowledge Module Reference
The Self-Service Monitoring Portal requires the list of PATROL Knowledge Modules available to TrueSight. A default list is provided out-of-box, but you may need to update it based on your own list of Knowledge Modules. Follow this procedure to generate a new list.
1. Copy the file $PROACTIVEPACK_HOME/Tools/bin/ReadTrueSightRepository.pl to your TrueSight Presentation Server, OR (e.g. if perl is not installed on TSPS) copy the content of the TSPS $TRUESIGHTPSERVER_HOME/truesightpserver/modules/cma/pproxy/depot_directory/bmc_products to a temporary folder of the proactivepack server.
2. From the command line, run the command (this is assuming that the script runs on the TSPS ; if you copied the files from TSPS to PPACK, adjust the path accordingly)
(linux) perl ReadTrueSightRepository.pl $TRUESIGHTPSERVER_HOME/truesightpserver/modules/cma/pproxy/depot_directory/bmc_products(windows) perl ReadTrueSightRepository.pl %TRUESIGHTPSERVER_HOME%\truesightpserver\modules\cma\pproxy\depot_directory\bmc_products
3. The script generates two files, ParamList.txt and KMList.txt in the same folder as the script. Copy those files to the ProactivePack server and copy them to
$PROACTIVEPACK_HOME/data/SelfServiceMonitoringPortal/reference
4. Ensure to run the “TrueSightImportParmsInDB” and “TrueSightImportProfilesInDB” tasks to update the ProactivePack repository.
Data import
Scheduling the script
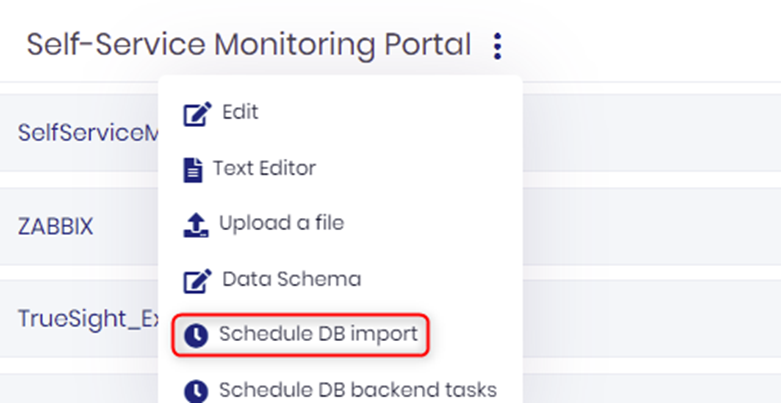
To configure the data import, enter and verify the parameters in the [BatchDBImport] section of the module configuration.
The DB import script is located under $PROACTIVEPACK_HOME/tools/bin and can be scheduled using the ProactivePack scheduler :
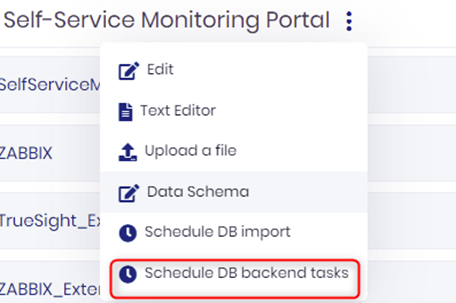
Scheduling backend tasks
Backend tasks are updates to the database that should happen quickly after a change is made using the self-service monitoring configuration module.
To configure the backend tasks, enter and verify the parameters in the [BatchDBImport] section of the module configuration.
The DB import script is located under $PROACTIVEPACK_HOME/tools/bin and can be scheduled using the ProactivePack scheduler :
Importing .cfg content
The ProactivePack Self-Service Monitoring Portal is able to consume PATROL « .cfg » files that contain agent configuration information (as obtained e.g. with the BMC PATROL command “pconfig –get”). This is used for threshold configuration reporting.
If you have such files and want to load them in the ProactivePack database, the .cfg files must be copied to $PROACTIVEPACK_HOME/data/SelfServiceMonitoringPortal/pconfig/new before importing. The files must have the format <devicename>-<port>.cfg [ e.g. vm-rh6-mysql-3181.cfg ]
The files, after they have been read and imported, will be moved to the $PROACTIVEPACK_HOME/data/SelfServiceMonitoringPortal/pconfig/old folder.
i In the present version, all “cfg” content of the ProactivePack database is erased when the import runs, then reimported from the .cfg files. The last version of the .cfg files must be present in the “new” folder before the import script runs.
User restrictions
The advanced permissions let you restrict data access when running Self-Service Monitoring Portal. You can e.g. specify that user group “Linux” can only query or monitor devices where “OS equals Linux”. You can also define multiple conditions.
In the SelfServiceMonitoringPortal section of the user group, add entries as follows. (i) represents one or more integer values starting at 1 and ending at the value of the NumberOfQueryCond parameter.
a. NumberOfQueryCond – number of conditions that are added. This number must be > 0 to enable any condition
b. StartCond(i) – empty, or a combination of left brackets and/or the “NOT” statement
c. CondSlotName(i) – a valid reporting dimension (as visible in the selection dropdown of the query editor : DisplayName, OS, etc)
d. Operator(i) – equals, not_equals, has_prefix, has_suffix (as available in the operator selection dropdown of the query editor)
e. CondValue(i) – the value to test
f. EndCond(i) – empty, or one or more right brackets
g. JoinCond(i) – empty or AND/OR for multiple conditions
For example, to express “OS equals Linux” the values from the file would be as follows:
NumberOfQueryCond=1
StartCond1=””
CondSlotName1=”OS”
Operator1=”equals”
CondValue1=”Linux”
EndCond1=””
JoinCond1=””